Categories
- SWATCHES
- SHEETS
- PRE-NIPPED Crystal Glass
- MIXED-MEDIA Bags
- TILES : Ceramic/Porcelain
- INSERTS and EMBELISHMENTS
- KITS
- TOOLS, GLUE, MESH
- GROUT
- BASES
- PATTERNS and E-BOOKS
Specials
-

T : Letter Tile - Small Ceramic Insert
R8.00 (-30%) R5.60
MOSAIC INFO:
- What is Mosaic?
- Mosaic Design
- Common Mosaic Mistakes
- Things to Consider
- Mosaic Colour Basics
- Mosaic Materials
- Mosaic Surfaces & Adhesives
- Transferring Mosaic Patterns
- Cutting Tools
- Cutting Techniques
- The Indirect Mosaic Method
- Pique Assiette Method
- Choosing Grout Colour
- How to Grout your Mosaic
- Side Finishing Options
Search
INTRODUCTION TO 2-WHEEL MOSAIC TILE CUTTERS
| This Article was originally published in Craftwise Magazine (No 73 May/June 2010): Our thanks to the author for permission to republish this. Written by Cher Cahn Cherian Mosaics www.cherianmosaics.com MASA Member |
When I first started mosaic five years ago I was given a pistol-grip oil-filled tile cutter by the salesman at a local craft store! Have you ever tried cutting a 25x25mm glass tile with this contraption? Having to first “score” the tile to mark the line of the cut was bad enough but then having to “break” the tile along the score line with a plastic snapper was an exercise in frustration to say the least. It only took 14 projects and three months to eventually discover the 2-wheel cutter and at last I found a tool that I could work with!
Since then I have been amazed at how many people are quite happy to cut their tiles in various strange methods; from using huge tile cutters used for floor and wall tiles to “smashing floor tiles with a hammer”. The one constant remained – to be able to mosaic was most important – how they got tiles into the shape they needed was completely immaterial! The two-wheel mosaic cutter is a great tool to use – it is light, easy to use and pretty much does everything you need it to do to create a mosaic masterpiece. Following are a few tips and tricks which will make cutting tiles a whole lot easier and help you experiment with more confidence.
The cutter works very much like a scissors with the handles crossing into the cutting base with two wheels attached. A spring allows for recoil once the cut has been made and should be replaced if the recoil is no longer brisk and firm.
 Some cutters are equipped with a guide (a small L-shaped metal piece which is adjusted with an allen key) which comes in very handy if you have large amounts of tiles to cut in the same shape. Place the tile between the wheels and adjust the guide so that it will place the cutting edges in the middle of the tile, and tighten in place with the allen key. It makes cutting tiles in triangles a little difficult so move the guide out of the way.
 When buying a new cutter, I recommend that you first check to ensure that the wheels are tight. Using an allen key tighten the bolts until there is no movement at all. Squeeze the wheels together and using a black permanent marker draw a line across the wheels where the cutting edges meet. When you feel that the wheels are getting blunt, loosen the wheels with an allen key and turn them a notch. When you have rotated the wheels 360 degrees and the lines meet up again, you know it is time to replace the WHEELS and not the whole cutter.
 As most of the power and control comes from the base of your thumb, hold the cutter as far back as possible with the wheels facing inward. This marvelous tool works for both left-handed and right-handed operators, but the point is that you hold the cutters with the base of your
  thumb resting on the back indentation. Hold your fingers close together to have the most powerful grip possible. Whatever you do, do not let your fore finger get in between the handles – it really hurts when you squeeze the handles together.
Cutting simple shapes:
For this article 25x25mm Glass tiles were used but are applicable to most mosaic tiles. These instructions will not work on tiles bigger than 5x5cm.
If you want to cut a tile in half (rectangle) you need to be sure of three things:
- ensure that the cutting edge is centered on the tile from top to bottom and from left to right
- ensure that the cutter is straight up and

- ensure that the tile is straight (at a later stage you might want the cut to curve slightly and you will then tilt the cutter accordingly, but for now we want to cut tiles in straight lines)
When you are sure that all is lined up correctly, squeeze the handles together and if you placed your other hand under the tile, you should have two equal pieces.
 If you want to cut a tile in a triangle, the same rules as above apply regarding alignment of cutter and tile.
It often happens that when you have cut the tile you are left with uneven pieces.  Try again and make sure that your cutter is upright and that the tile is centered perfectly under the cutting edges.
Cutting circles  are a little more challenging and takes a bit of practice.
  Firstly cut off a small bit off the edges which will leave you with an odd-shaped tile. Next, nibble all the sharp edges away while rotating the tile until you have formed a circle. You need to try and ensure that your circle does not look like a mouse has nibbled away at it by cutting sharply and not “grinding” the edges. Continue until you have completed your circle.
Remember, that the bigger corners you cut off the tile at the beginning, the smaller your circle will be.
At some point you will want to mosaic something with a floral theme and adding leaves will be a requirement to make the mosaic more interesting. These simple patterns are really easy to do and have an amazing effect:

Start by cutting off a small corner of a tile and then cutting the same amount off the opposite edge.
Next, nibble away at the sharp edges until you have a smooth leaf shaped tile. If you want a long, narrow leaf you could either cut the tile in half at the beginning or cut bigger corners off. We will call this Leaf No.1.
If you now cut the leaf in half and glue it down with a little space in between, the grout creates a “vein” which we will call Leaf No.2. 
The next step is a little tricky because if you drop a piece you could spend some time puzzling it back together. Taking one half of the tile and cut two (or three) pieces at an upward angle away from the centre line.  When you glue them down with a little space in between, grout now forms more “veins”! This we will call Leaf No3.
You could even combine two different shades into one leaf which adds a different dimension in shading! (Leaf No.4)
If you have a large area of “foliage” you need to mosaic, using a combination of all four Leaves will quickly fill the area and create a wonderful effect.

Should you need to mosaic a curved area or mosaic a circle, you need to cut the tile at a slight angle to follow the line and the tiles will fit neatly next to each other.
For an interesting effect for grass or flames in a mosaic you can 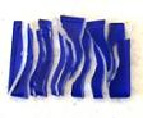 also try this “feather” or “flame” cut. As you can see the cutter remains at the centre of the tile as you move the tile slightly to the right, the cuts close together. Unfortunately you do not have much control on how the pieces come out but still have fun placing them.
Like everything else in life – the more you practice, the more proficient you will become at cutting tiles. The trick is to cut with confidence, if you hesitate and “grind” the tile, you will not get the end result you want. Some 2-wheel cutters are manufactured better than others, so a simple check to ensure that the wheels are tight will prevent them shattering. Safety is always a concern so try and either hold on to the tile or put a hand over the tile to prevent shards from flying out and causing an injury.
Working with different kinds of tiles has different challenges, for example
- Riverglass tends to crumble and you need to cut across the ridges
- Ceramic tiles are harder to cut than glass tiles
- Glass tiles can look as if a mouse has nibbled at it if you don’t make sharp, clear cuts
- Mirror tiles tend to splinter
All of these challenges are handled well by the 2-wheel mosaic cutter. There are other types of cutters used by mosaic artists for different styles of mosaic applications, yet are not as versatile, cost effective or user-friendly as this.
Cher Cahn
Cherian Mosaics
www.cherianmosaics.com
MASA Member
Article published in Craftwise Magazine (No 73 May/June 2010):
INTRODUCTION TO 2-WHEELED MOSAIC CUTTERS
Cart
New products
No new products at this time